
Quick Navigation
Installation – Update NinjaScript Add-On – Obsidian Indicator Suite
ADDTS – DDTS – Obsidian Overwatch – Obsidian Orderflow Delta
Obsidian News – Obsidian Moving Average Suite – Obsidian TradeGuard
Orenko Bar & Orenko Threshold – Frequently Asked Questions
General Installation
For Instructions on Installing the NinjaTrader 8 Desktop Platform
Click Here
How To Import Your NinjaScript Add-On
1. From the Control Center window select the menu Tools > Import> NinjaScript Add-On… to open the “Import” dialog window
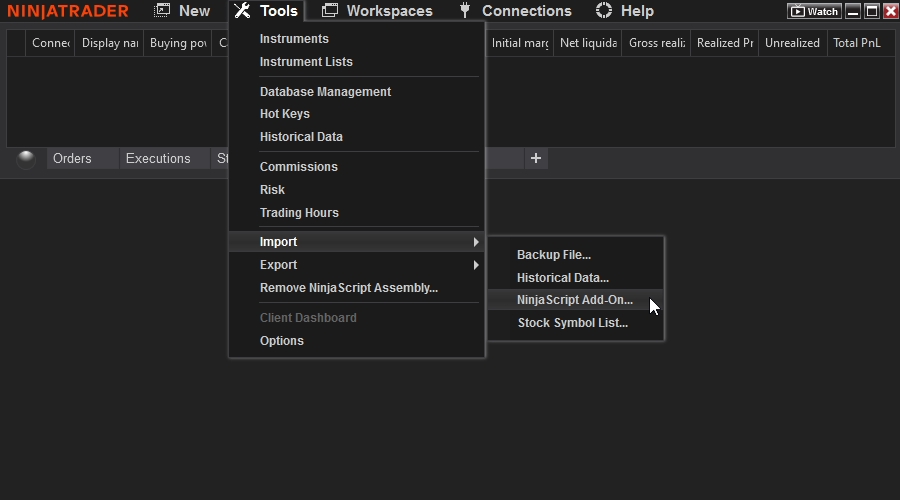
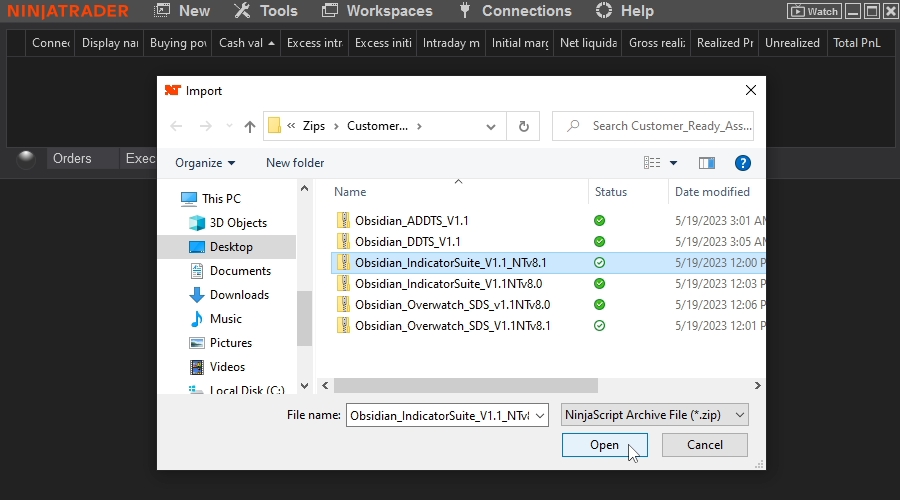
2. Select the .zip file you want to import and click open

3a. If asked to overwrite any sound or image files select no unless directed to do so
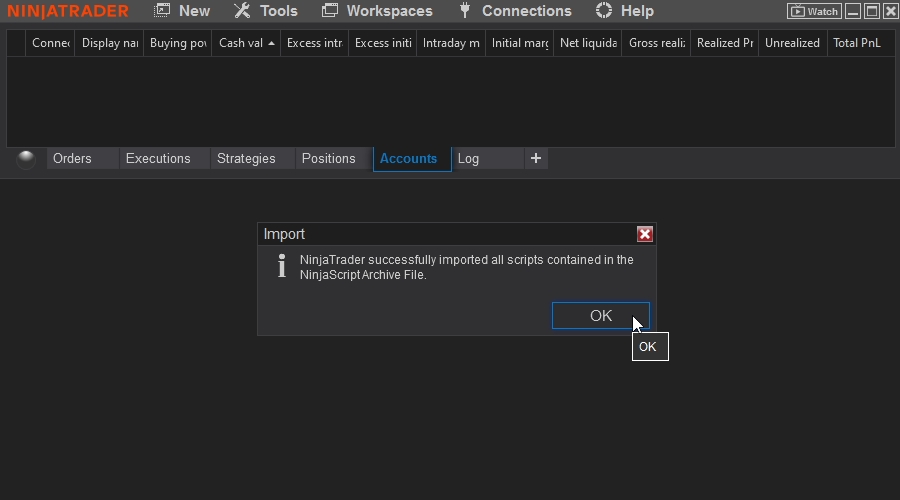
3b. You should then see a successful import pop-up
How To Update Your NinjaScript Add-On
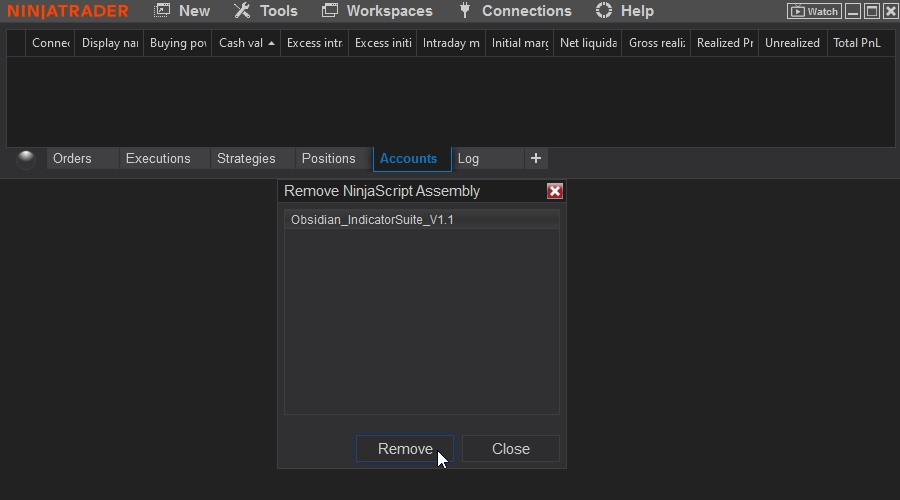
1. From the Control Center window select the menu Tools > Remove NinjaScript Assembly to open the dialog window

2. Select the assembly you are updating and click the “Remove” button
3. Then Import the updated NinjaScript Add-On as shown in steps 1-3 Here
Jump to Quick Navigation
Obsidian TradeGuard
place holder…………………………………………………………………………………………………………………………………………………………………………………………………………

Jump to Quick Navigation
Obsidian Indicator Suite
Before Importing the Obsidian Indicator Suite make sure that you have downloaded the matching NinjaTrader 8 version (NTv8.1 or NTv8.0) If you download the wrong version the preconfigured workspace will be incompatible
**Note before opening your workspace be sure to have downloaded and imported Orenko bars as the workspace opens to that bar type, otherwise your chart will be blank when you open the workspace**
Click Here to get Your Free Copy of Orenko Bars
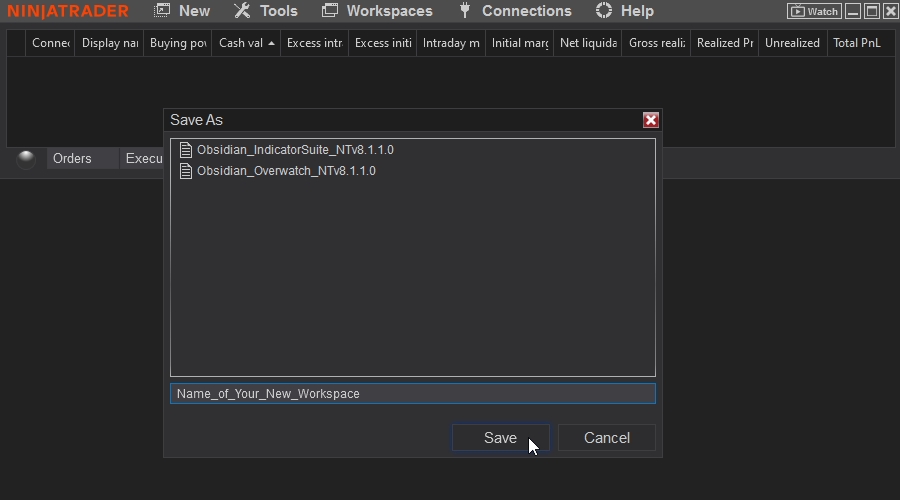
It is recommended to save a copy of the workspace to have a default to revert to if you accidentally overwrite the workspace click Save As
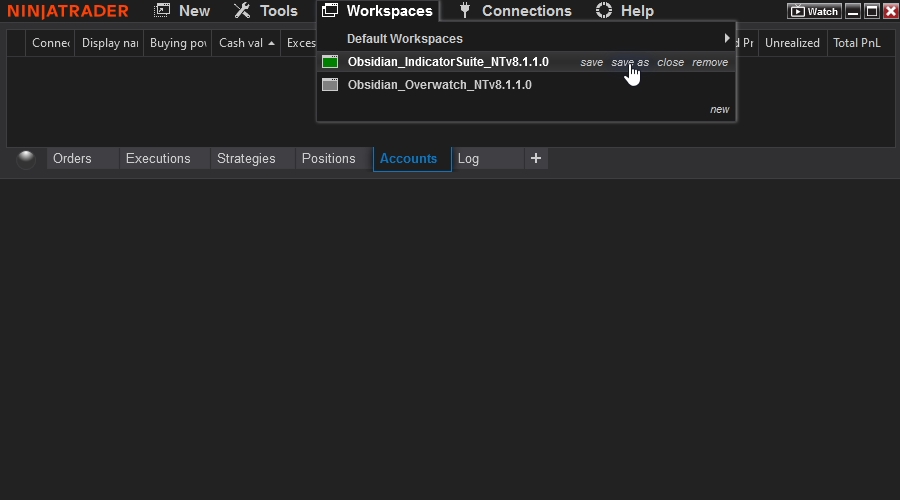
Then rename the copy and click save, then open the new workspace, configure your layout as desired, then from the workspace dropdown menu select Save
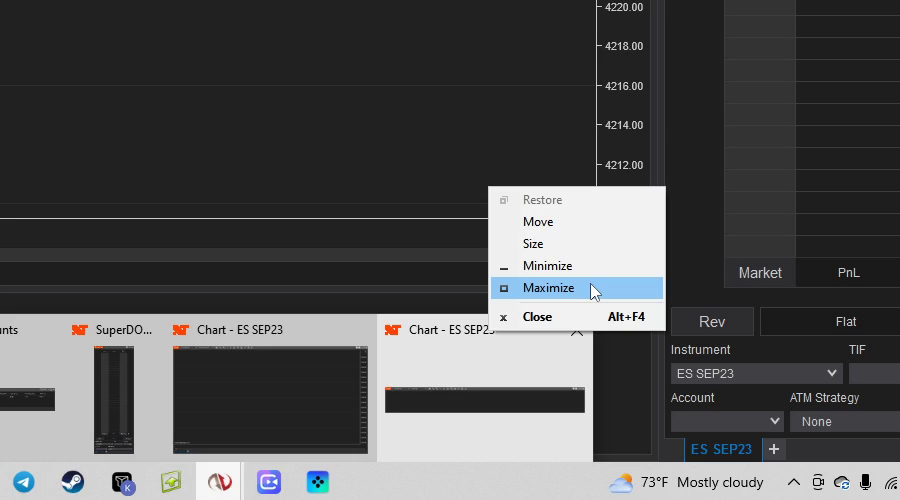
If any windows are hidden off screen just hover your mouse over the NinjaTrader icon on the Taskbar and right-click on the hidden window to maximize the window
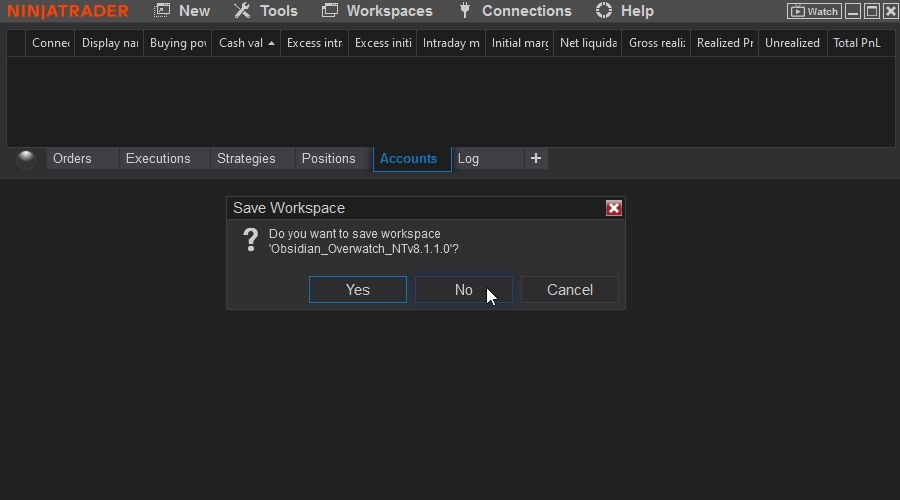
When closing NinjaTrader always be sure to select no when prompted to save your workspace otherwise, it will be saved as a blank workspace
Follow The Links Below For More Information Regarding The Individual Indicators
ADDTS – DDTS – Obsidian Overwatch – Obsidian Orderflow Delta
Obsidian News – Obsidian Moving Average Suite – Orenko Bar & Orenko Threshold
Jump to Quick Navigation
Automated Dark Diamond Trend Sniper
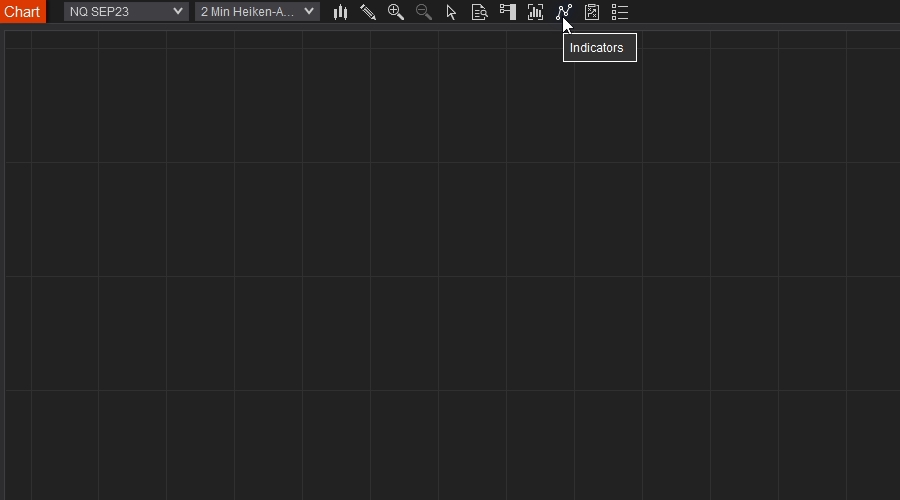
From the Chart window select the Indicators Icon to open the Indicator configuration window
From the Available Indicators tab select the Obsidian_Indicators folder and double click both the “◈ Obsidian-ADDTS ◈” and ◈ Obsidian-ADDTS-TrendFilter ◈ to add to the configured tab
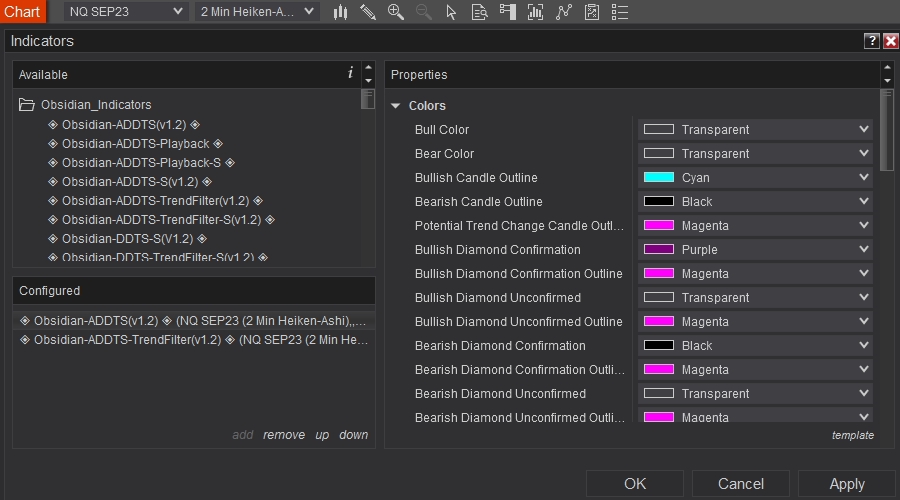
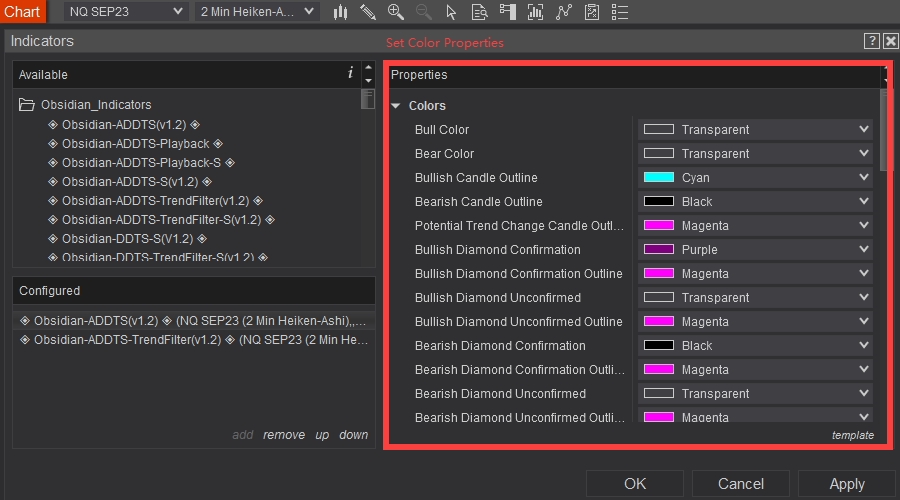
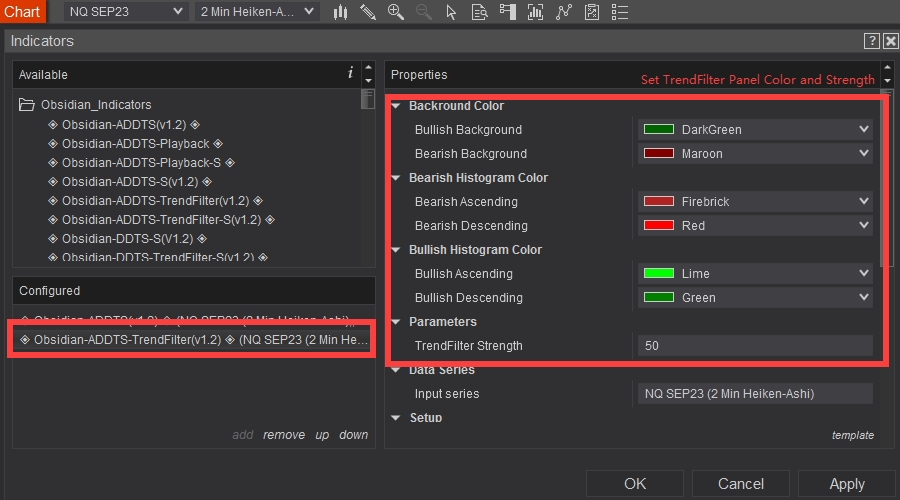
Select ◈ Obsidian-ADDTS ◈ in the Configured tab to configure your preferred color properties **Note SuperTrend is defaulted to transparent “Bull Color” “Bear Color”**
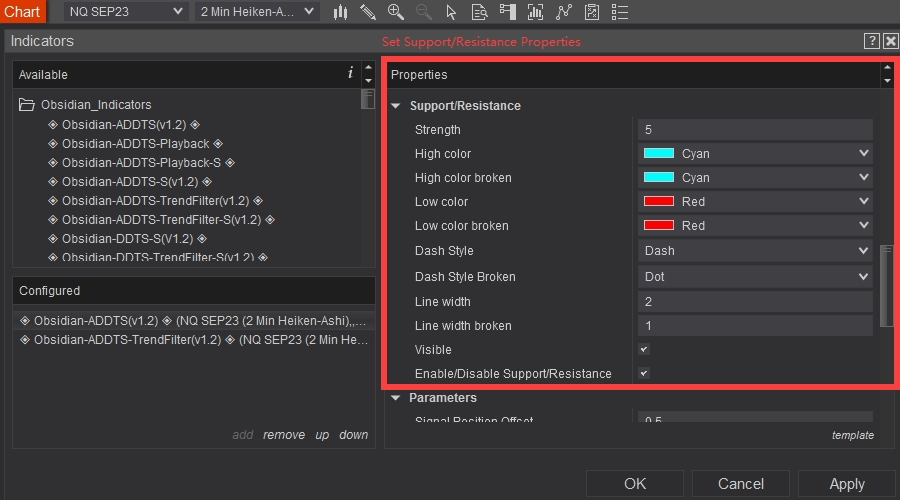
By scrolling further down you can also configure your support and resistance properties
In the parameters section you can set your TrendFilter strength, TrendFilter color properties, and signal position offset

Select ◈ Obsidian-ADDTS-TrendFilter ◈ in the Configured tab to configure your preferred color properties and Trendfilter strength
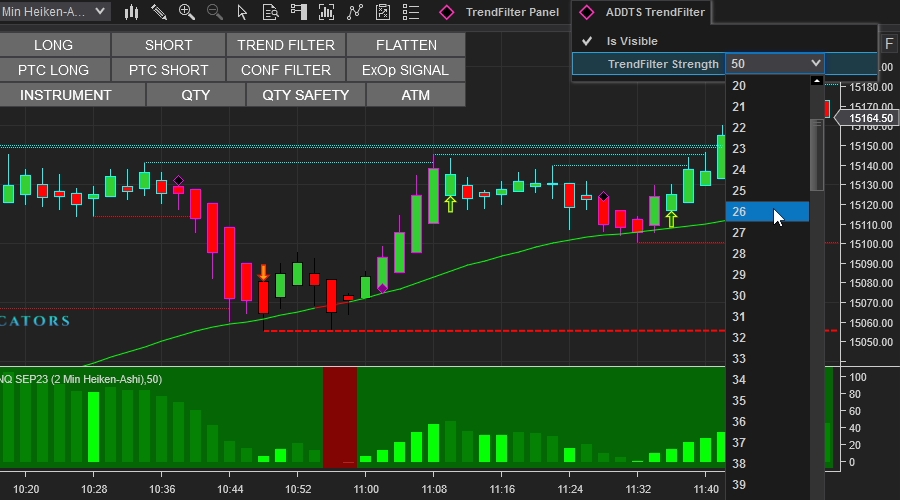
TrendFilter Strength can also be set from the drop-down menu item
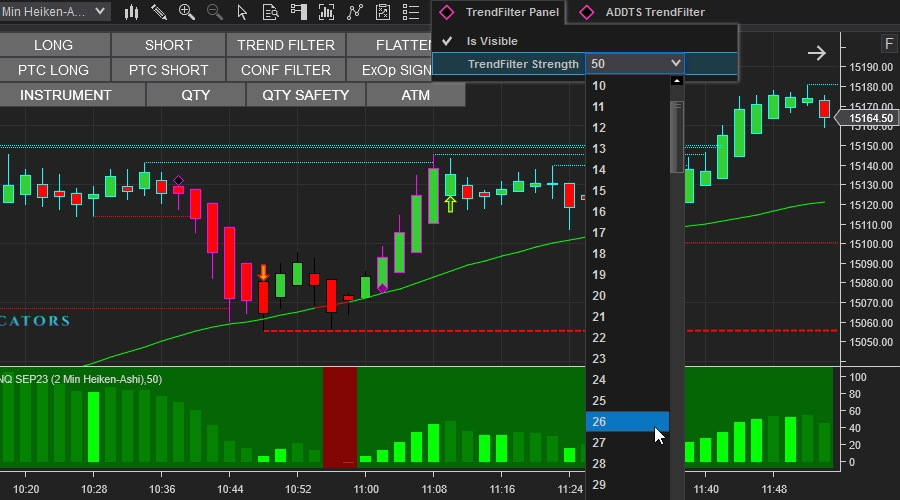
The ADDTS TrendFilter Strength can also be set from the drop-down menu item
**Note** The ADDTS TrendFilter Strength dictates the automated trading algorithm while the TrendFilter Panel dictates the sub-panel which has no effect on ADDTS and acts as a visual aid
Account ID – Selects the current account from the chart trader dropdown menu

Instrument – Selects the current instrument from the chart trader dropdown menu

Quantity – Selects the current quantity from the chart trader dropdown menu

Quantity Safety – An added safety measure Click Here for a more detailed explanation

ATM – Selects the current atm from the chart trader dropdown menu

Armed – Activates the ADDTS

Disarmed – Deactivates the ADDTS

Flatten – Closes any open positions and “Disarms” ADDTS

Auto – When auto is enabled ADDTS will continuously take trades on signals and reverse on opposite signals

Semi – When semi is enabled ADDTS will take a single trade and revert to its default state

Trend Filter – When trend filter is enabled signals opposite of the current trend will be ignored, Click Here for a more detailed explanation

Confirmation Filter – When confirmation filter is enabled only confirmed signals will be taken, Click Here for a more detailed explanation

Exit on Opposite Signal – When ExOp Signal is enabled while in a current trade, ADDTS will exit on the next opposite signal, Click Here for a more detailed explanation

Unconfirmed PTC Short Signal – This will appear at the top of the bar at any point the conditions are met, to enable the ADDTS to take an entry on this signal select “PTC SHORT” without the “CONF FILTER”

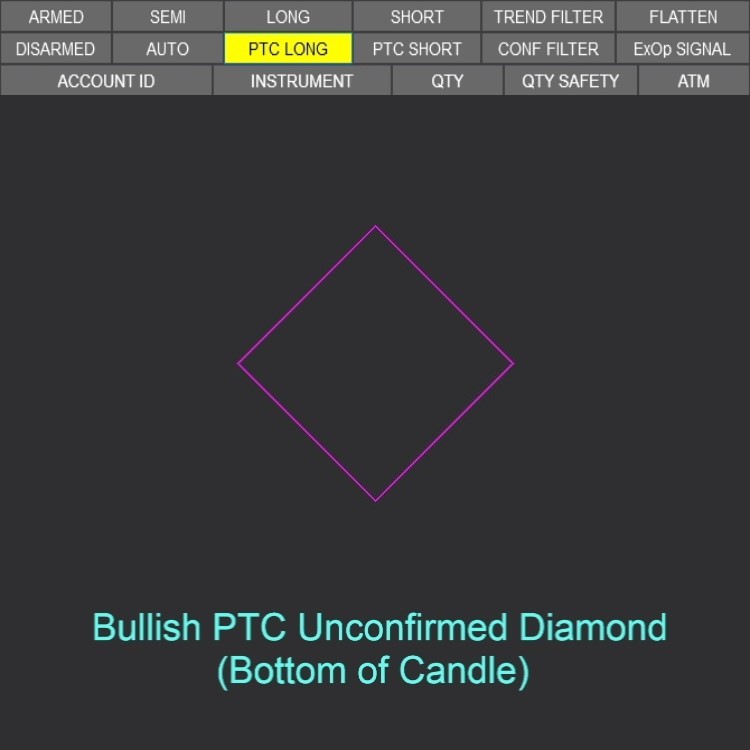
Unconfirmed PTC Long Signal – This will appear at the bottom of the bar at any point the conditions are met, to enable the ADDTS to take an entry on this signal select “PTC LONG” without the “CONF FILTER”
Unconfirmed Short Signal – This will appear at the top of the bar at any point the conditions are met, to enable the ADDTS to take an entry on this signal select “SHORT” without the “CONF FILTER”
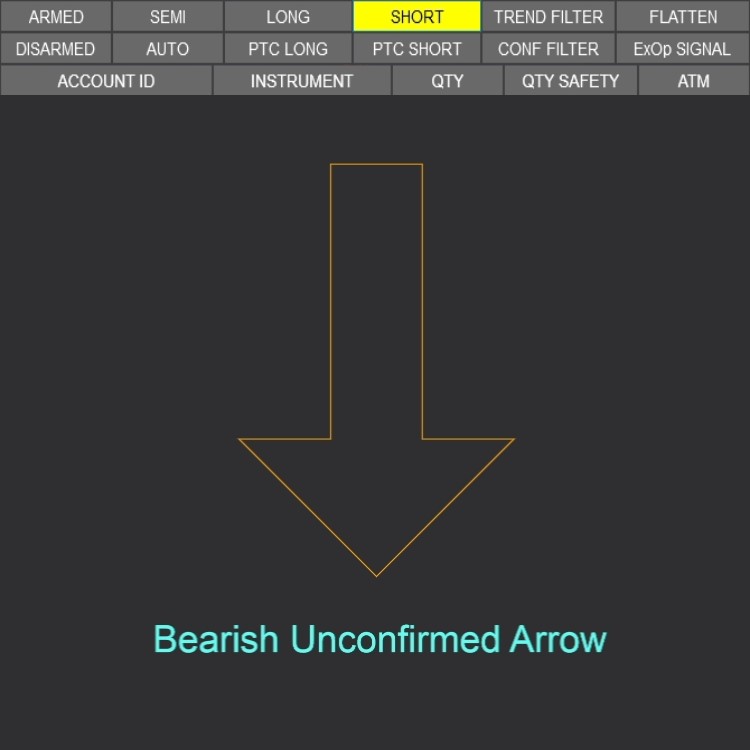
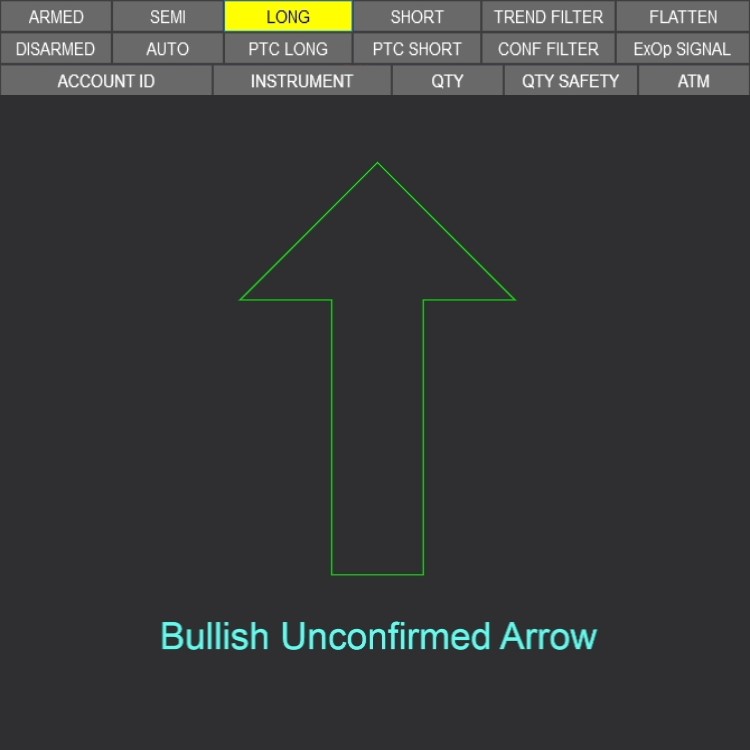
Unconfirmed Long Signal – This will appear at the bottom of the bar at any point the conditions are met, to enable the ADDTS to take an entry on this signal select “LONG” without the “CONF FILTER”
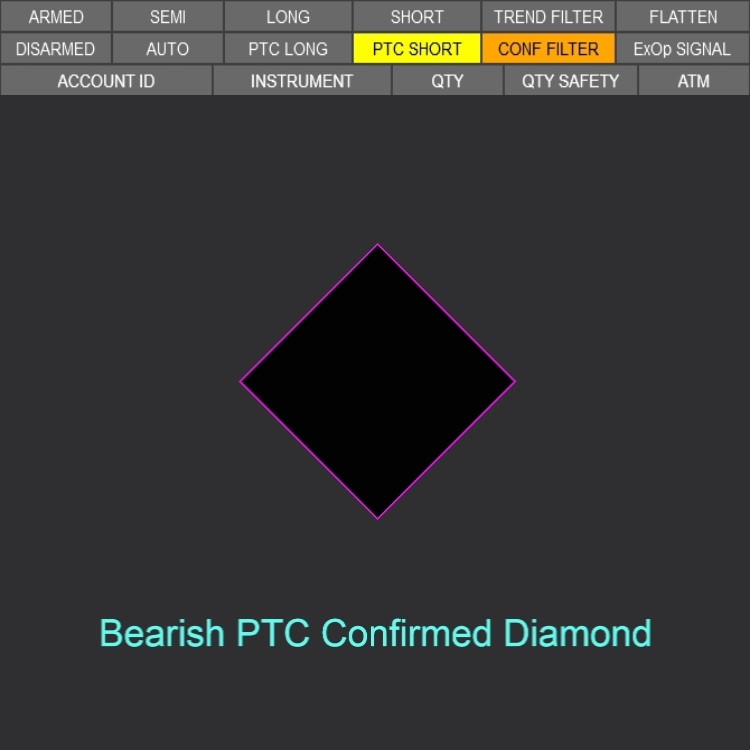
Confirmed PTC Short Signal – When an Unconfirmed PTC Short Signal bar closes Confirmed the hollow outline of this signal will fill in as a solid color, to enable the ADDTS to take an entry on this signal select “PTC SHORT” with the “CONF FILTER”
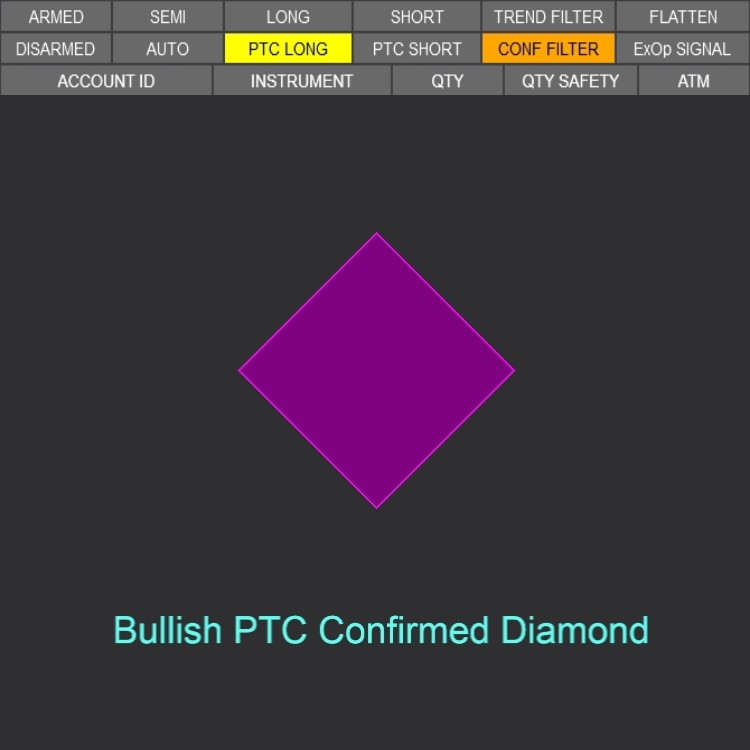
Confirmed PTC Long Signal – When an Unconfirmed PTC Long Signal bar closes Confirmed the hollow outline of this signal will fill in as a solid color, to enable the ADDTS to take an entry on this signal select “PTC LONG” with the “CONF FILTER”
Confirmed Short Signal – When an Unconfirmed Short Signal bar closes Confirmed the hollow outline of this signal will fill in as a solid color, to enable the ADDTS to take an entry on this signal select “SHORT” with the “CONF FILTER”
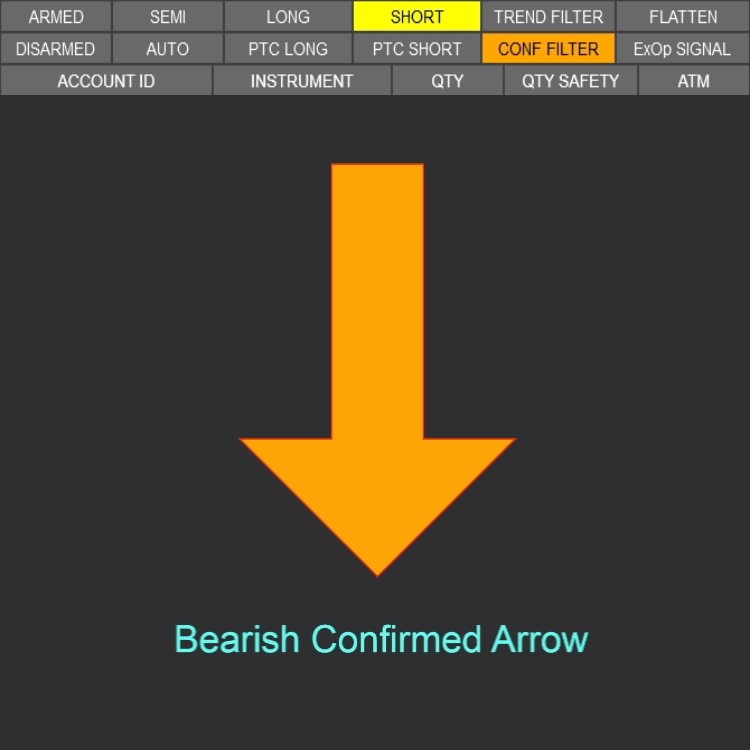
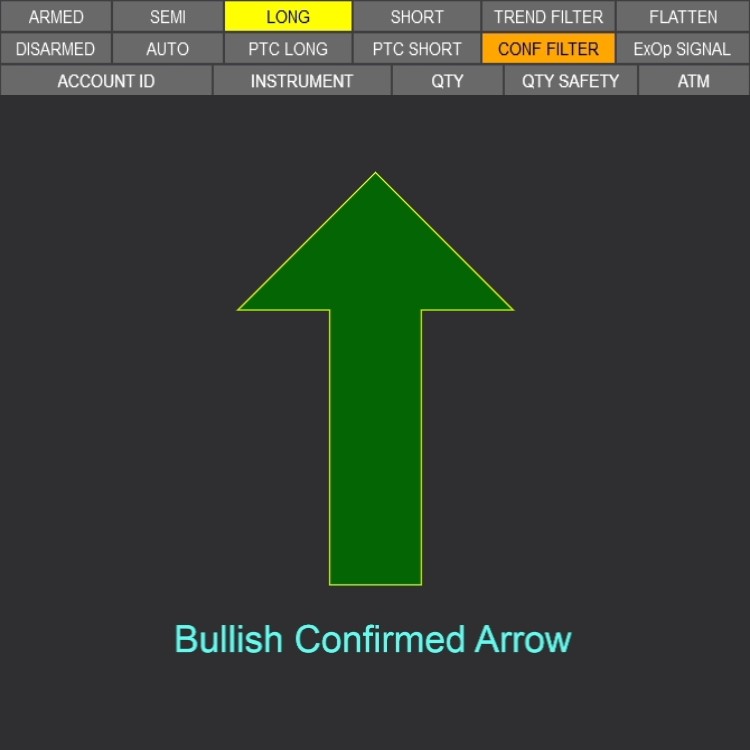
Confirmed Long Signal – When an Unconfirmed Long Signal bar closes Confirmed the hollow outline of this signal will fill in as a solid color, to enable the ADDTS to take an entry on this signal select “LONG” with the “CONF FILTER”
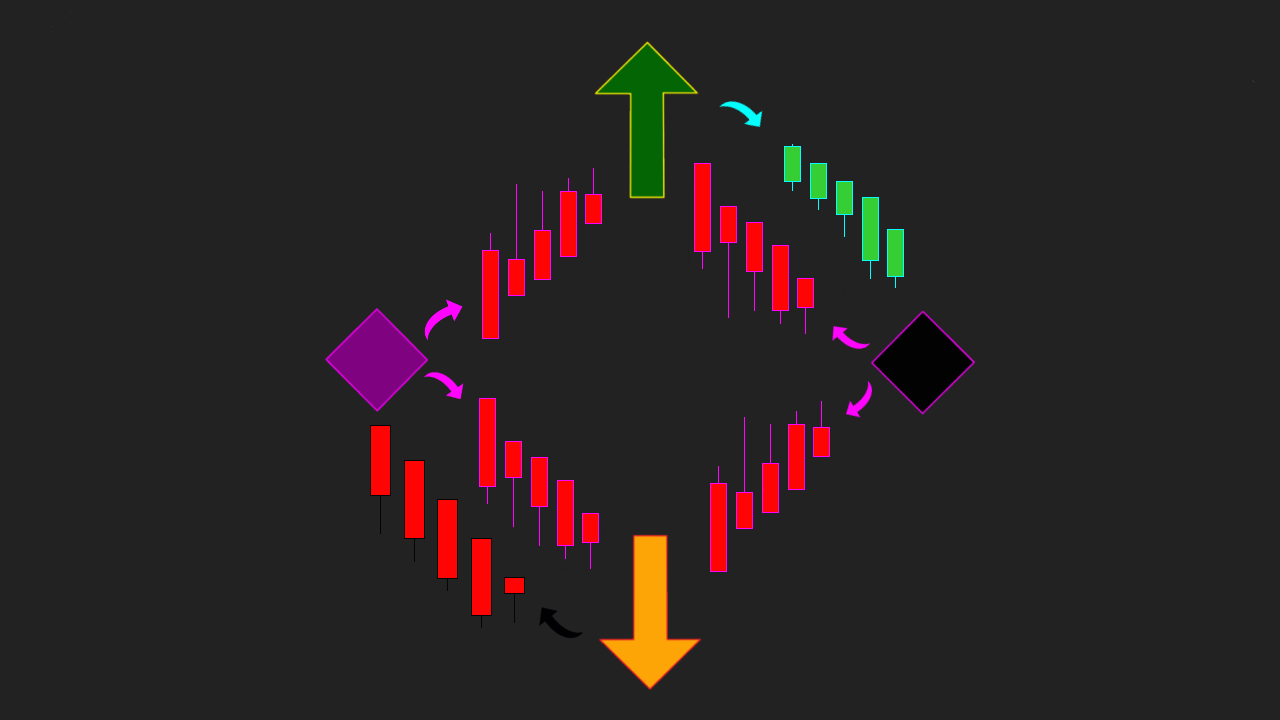
Signal Life Cycle:
While in a Bearish Trend (Black Outline) the next signal will be a PTC Long (Magenta Outline) if the price continues to be bullish a Long signal (Aqua Outline) will be formed, if the price reverses to bearish before a Long signal is formed a Short signal will be formed and the outline will return to Black.
While in a Bullish Trend (Aqua Outline) the next signal will be a PTC Short (Magenta Outline) if the price continues to be bearish a Short signal (Black Outline) will be formed, if the price reverses to bullish before a Short signal is formed a Long signal will be formed and the outline will return to Aqua.
When Taking Entries on Unconfirmed Signals it is Recommended to Monitor for the Unconfirmed Signal to Confirm, If a Signal is Unconfirmed and the Bar Closes with the Same Outline Color as the Previous Trend an Opposing Signal May Not be Produced. The Benefit of Using Unconfirmed Signals is that You Gain a Better Entry Price at the Higher Risk of The Signal Not “Confirming”. You can view the same trade as a “Confirmed” entry Here
Unconfirmed Signals may appear anywhere in the current bar when the conditions are met **Note if you arm ADDTS while on a live bar that has a corresponding signal an entry will be taken. You can view the same trade as a “Confirmed” entry Here
Confirmed Signals will appear when an “Unconfirmed” signal bar closes “Confirmed” **Note if you arm ADDTS while on a live bar that has a corresponding signal an entry will be taken, When using “Confirmed” Signals this will be the bar after the signal.
When using a time-based bar like Heiken Ashi it is recommended to use a bar timer so you know exactly when an order will be submitted.
Confirmed Signals will appear when an “Unconfirmed” signal bar closes “Confirmed” **Note if you arm ADDTS while on a live bar that has a corresponding signal an entry will be taken, When using “Confirmed” Signals this will be the bar after the signal.
When using a price-based bar like Orenko it is recommended to use the Orenko Threshold Indicator or similar indicator for other kinds of price-based bars so you know exactly when an order will be submitted
The following example shows a “PTC Long” entry with both TrendFilter and Confirmation Filter, the trade is closed using “ExOP Signal” **Note that the filters and signals also apply to the closing trade, if you want to close on the next unconfirmed opposite signal simply disable the filters**
The following example shows an entry using “Semi-auto” This will take a single entry and revert to default and no more signals will be taken, if you want to reverse on the next opposite signal just re-enable “Semi”. In the example the trade is closed using “Flatten”. If you want to continuously take trades on signals select “Auto” instead.
The following example shows how “QTY Safety” Works, the number of orders is purposefully increased to trigger “QTY Safety” When triggered the trades will automatically be flattened and “Disarm” ADDTS. This is just an added safety measure for whatever reason more orders were submitted than quantified in “QTY”, although order qty errors have never been reported it’s better to be safe than sorry. **Note if you wish to manually add to your position be sure to disable “QTY Safety”**
The following example shows the application of your personal ATM Strategy, select your desired atm from the chart trader drop-down menu and select “ATM” in the ADDTS control panel **Note if you wish for your atm to fully play out use “Semi” if you choose to use “Auto” your position will be reversed on opposite signals.**
Jump to Quick Navigation
Dark Diamond Trend Sniper
place holder…………………………………………………………………………………………………………………………………………………………………………………………………………
Jump to Quick Navigation
Obsidian Overwatch
1a. Import the NinjaScript Add-On as shown in the General Installation accordion. Make sure you downloaded the correct .zip file for your version of NinjaTrader 8 (NTv8.1 or NTv8.0)
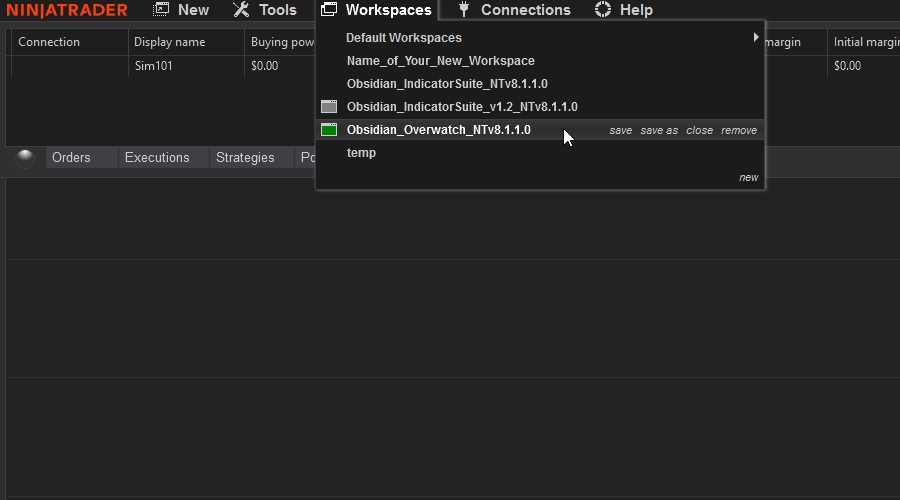
1b. From the Control Center window select the menu Workspaces > Obsidian_Overwatch to open the pre-configured workspace.
2. If any windows are not visible when loading the workspace you can bring them into view by hovering over the NinjaTrader Icon on your taskbar right-clicking and then selecting maximize.
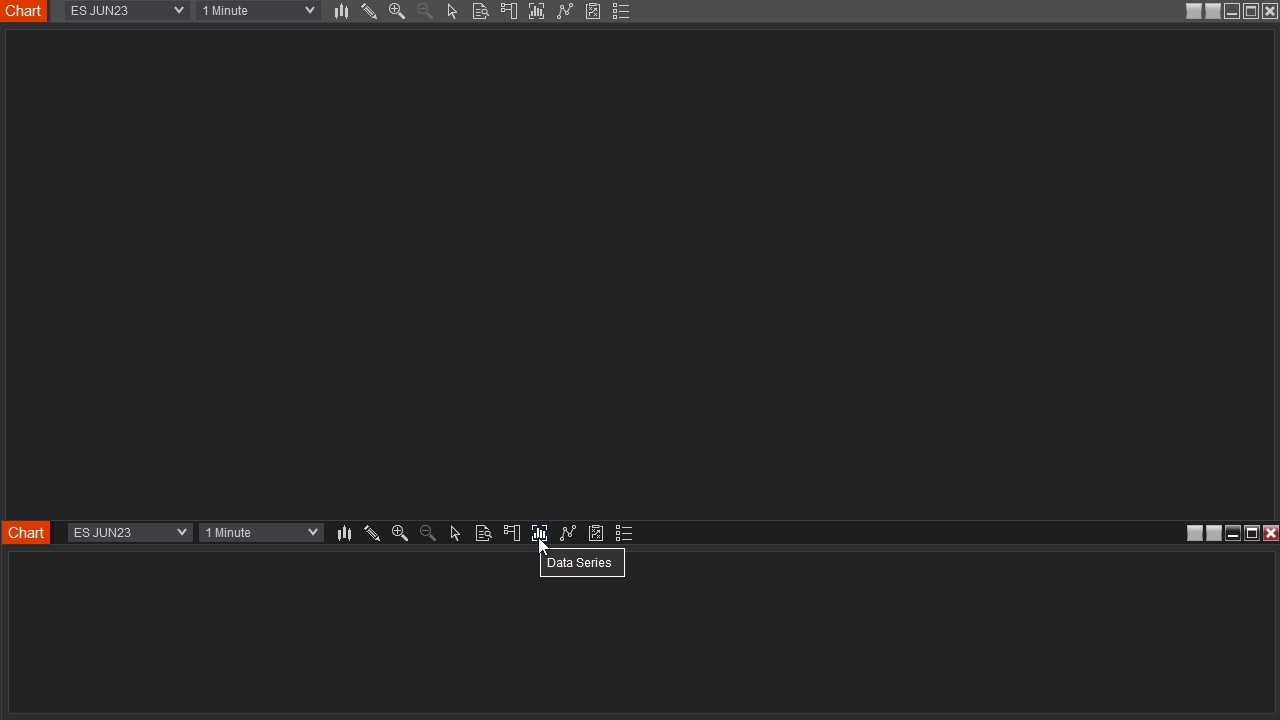
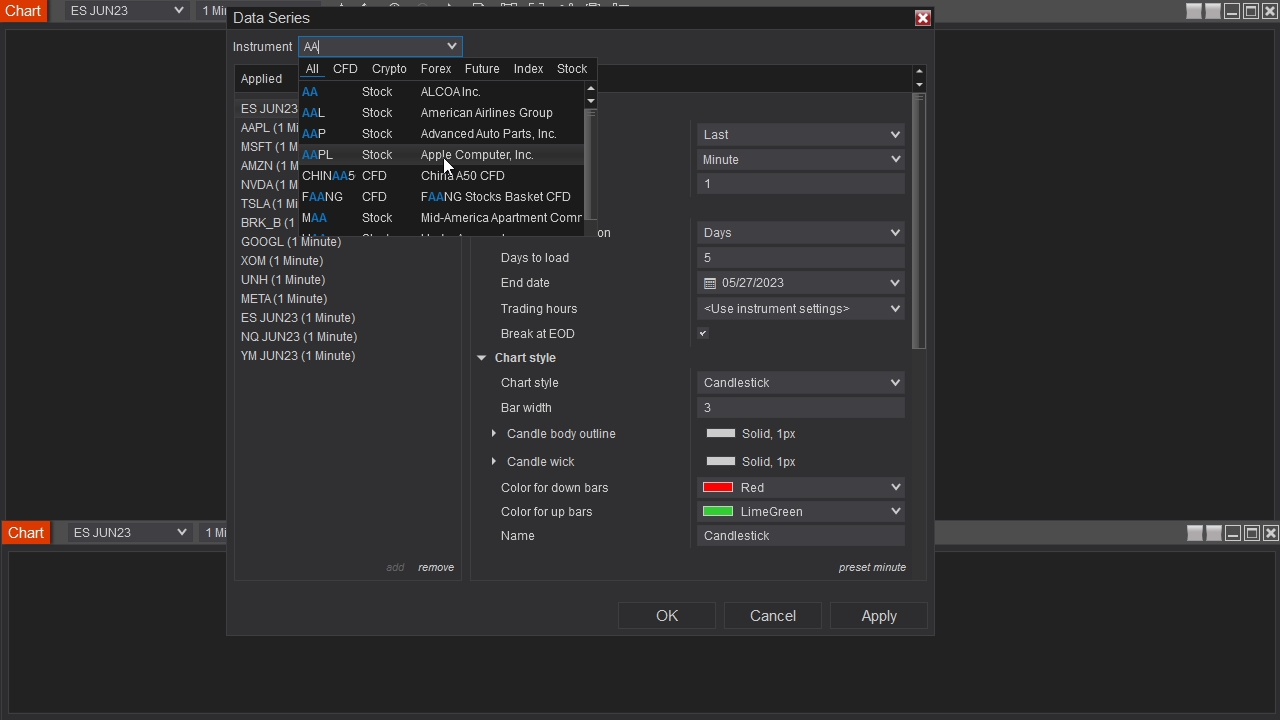
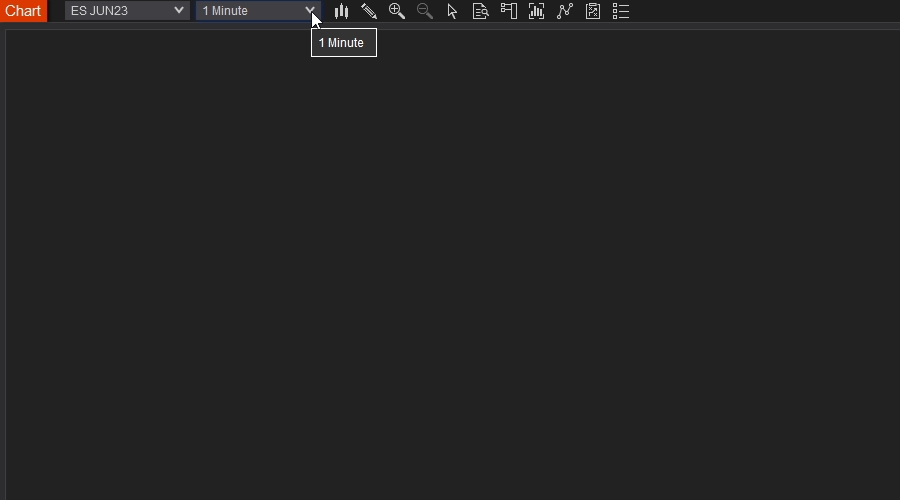
3. If you wish to add more instruments to Overwatch other than the pre-configured set, select Data Series on the chart window to open the Data Series window.
4. From the Instrument drop-down menu select your desired data series to apply to the chart. (Recommended period to use is 1 Minute)
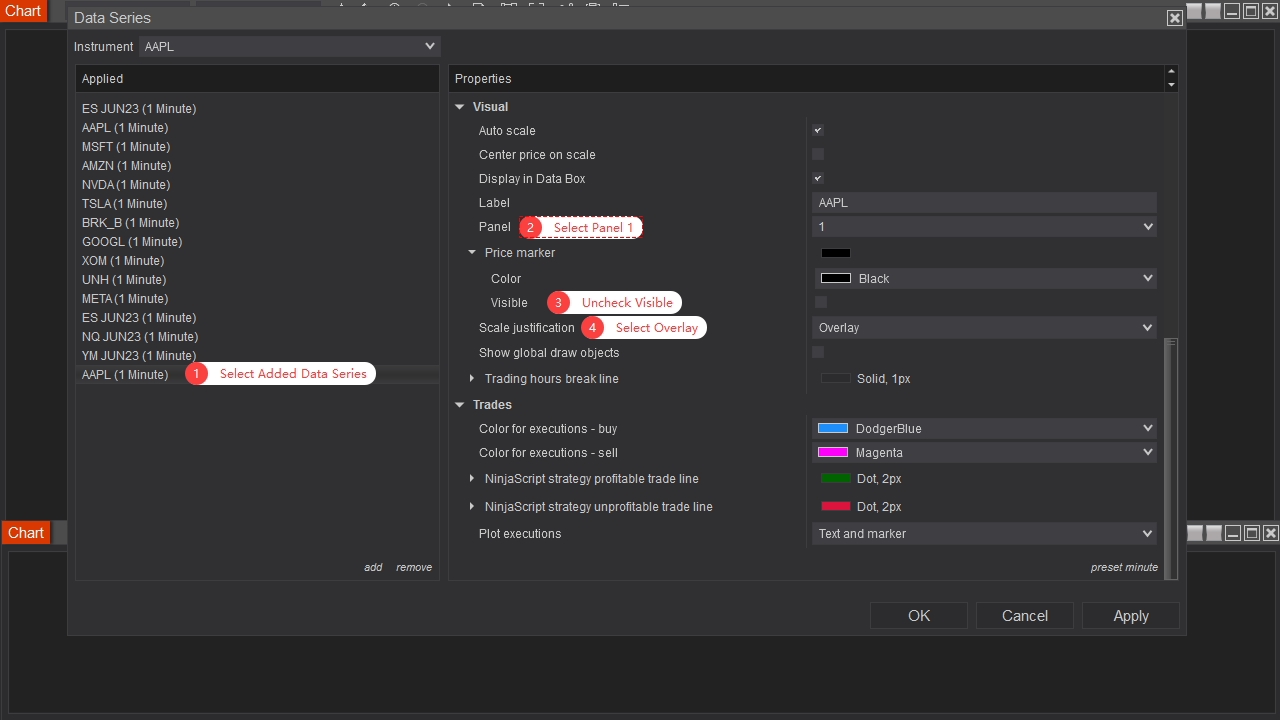
5. Select your added data series to configure the settings. Select panel 1, uncheck visible, and select overlay.
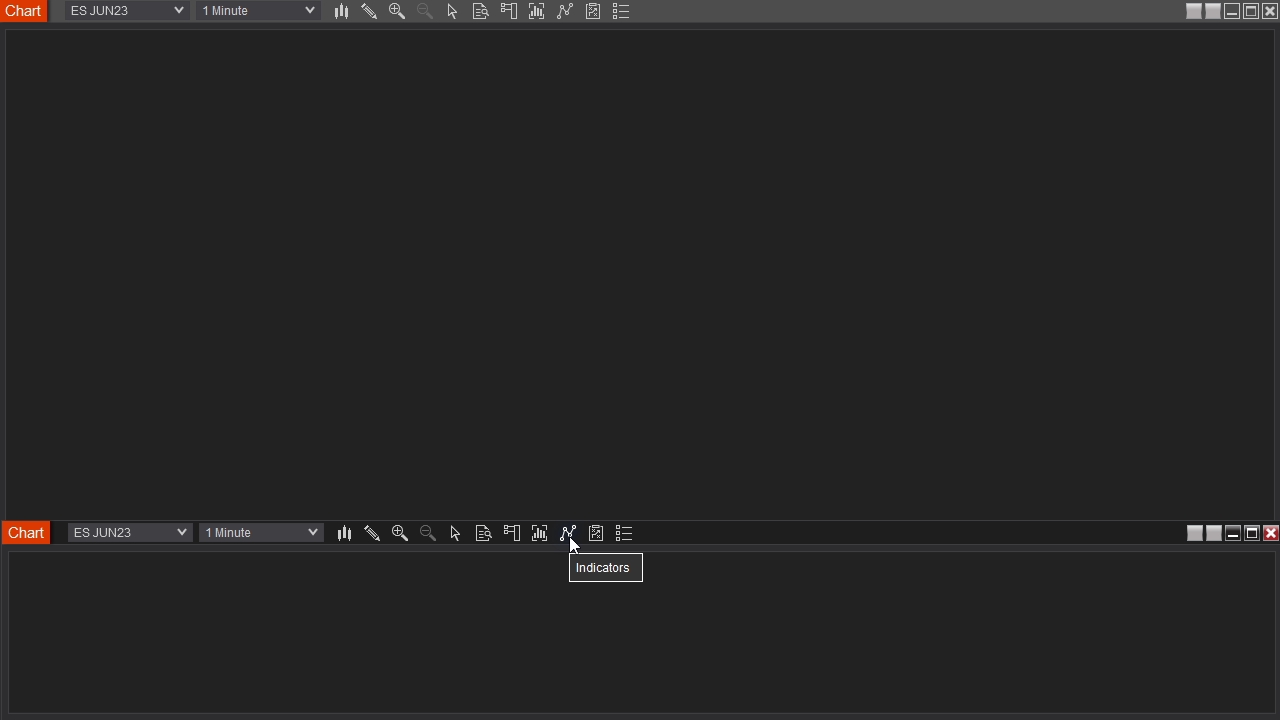
6. Then select Indicators on the chart window to open the Indicators window.
7a. Double click
◈ Obsidian-Overwatch-SDS ◈ in the available indicators tab to add it to the configured tab, then click on the newly added instance of overwatch in the configured tab.
7b. Then select your desired data series, change to panel 2, uncheck price markers, and change to overlay.
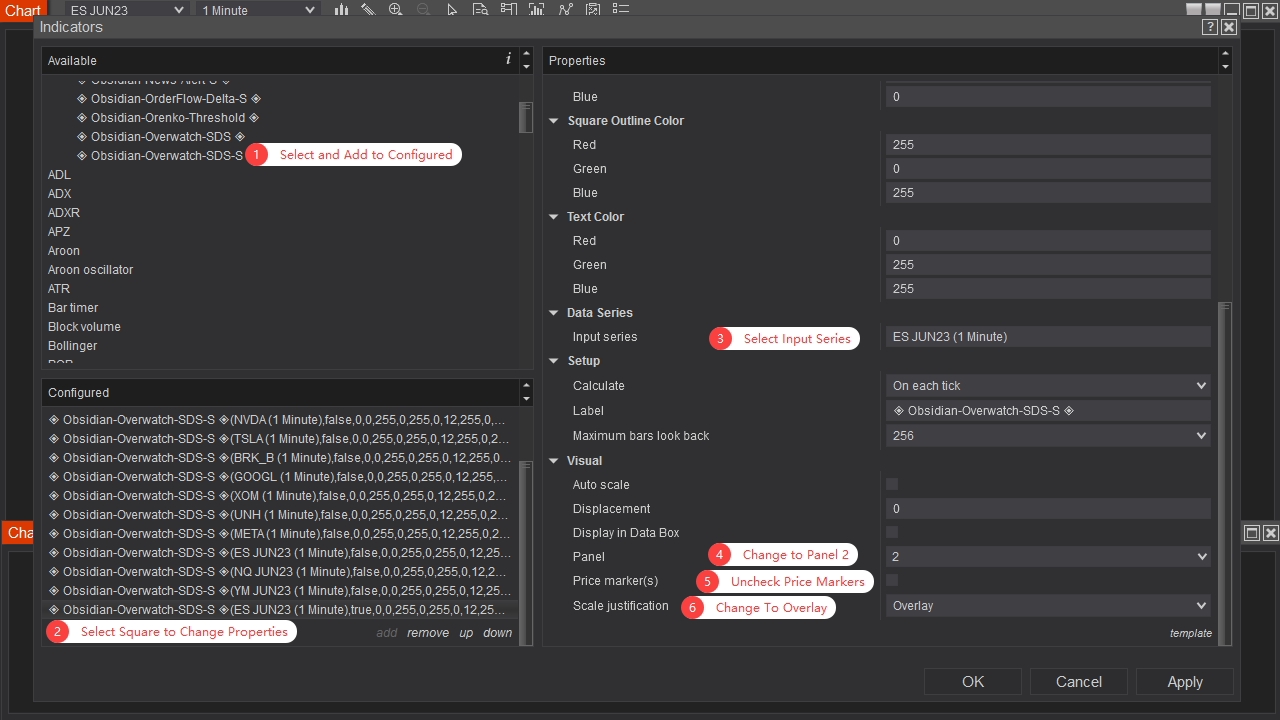
8a. From the Properties tab you can change the location of the newly configured square by setting the X and Y axis, you can also configure the square size, color, sensitivity, and font.
8b. You can repeat these steps to add as many squares as you desire.

Jump to Quick Navigation
Obsidian Orderflow Delta
Place Holder…………………………………………….. ……………………………………………………………………………………………………………………………………………………………………………………….
Jump to Quick Navigation
Obsidian News
Placeholder………………………………………………………………………………………………………………………………
Jump to Quick Navigation
Obsidian Moving Average Suite
placeholder………………………………………………………………………………………………………………………………………………………………………………………………………………
Jump to Quick Navigation
Orenko Bar & Orenko Threshold
For Instructions on Importing Your NinjaScript Add-On
Click Here
How To Configure Orenko Values
1. From the chart window, click the Interval selector.
2. Then Select “Configure”.
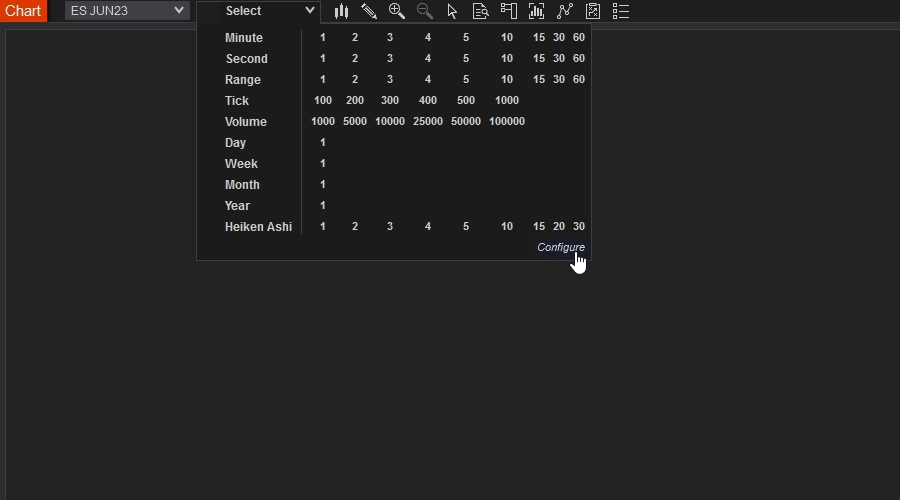
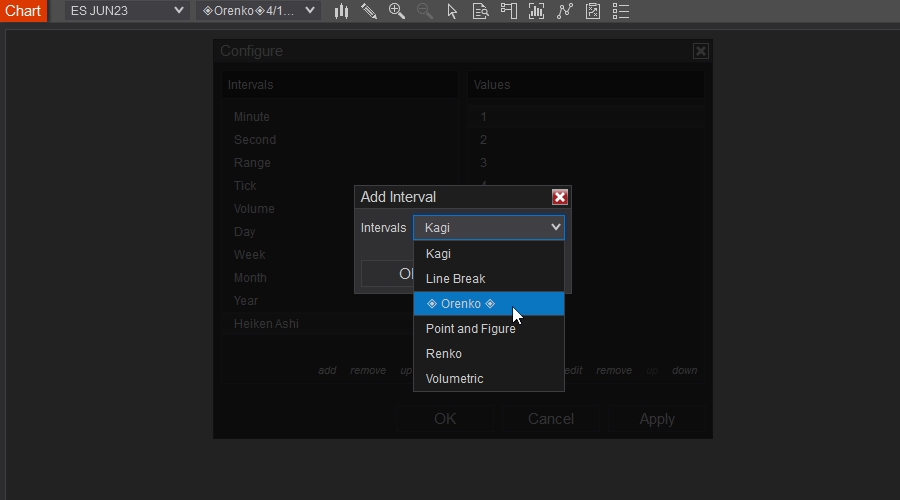
3. Select “add” from the Intervals dialog box.
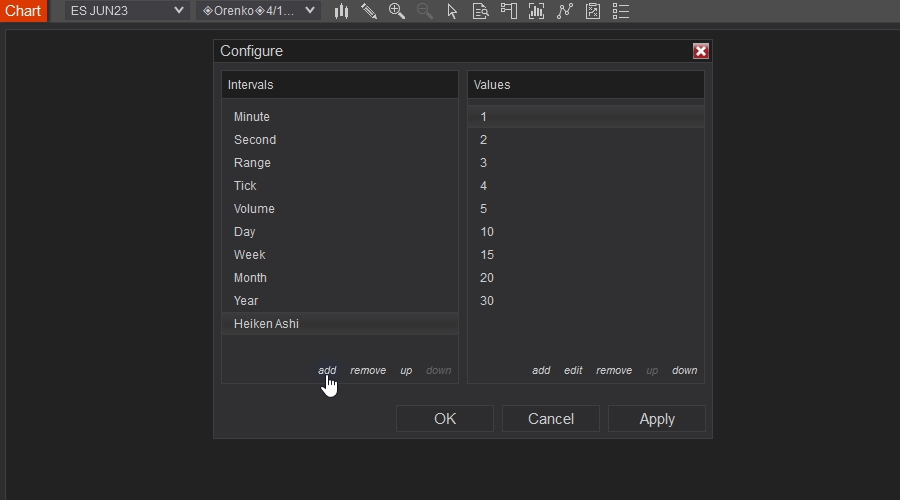
4. Select “◈ Orenko ◈” from the drop-down menu and click “OK”.
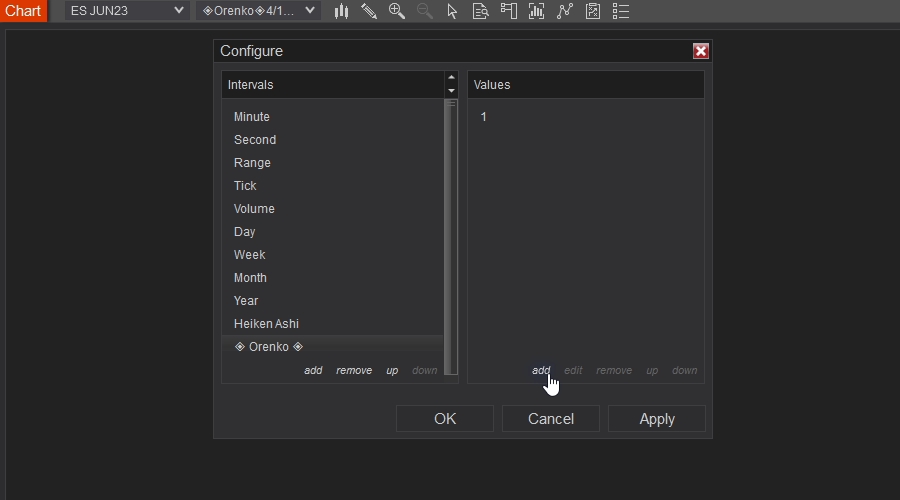
5. Select “◈ Orenko ◈” in the Intervals tab then click “add” in the Values tab.
6. Then add the values desired in the Properties window. Then repeat step (5.) to add more values
Value examples:
2/5/10
4/12/28
9/10/30
8/20/40
16/40/80
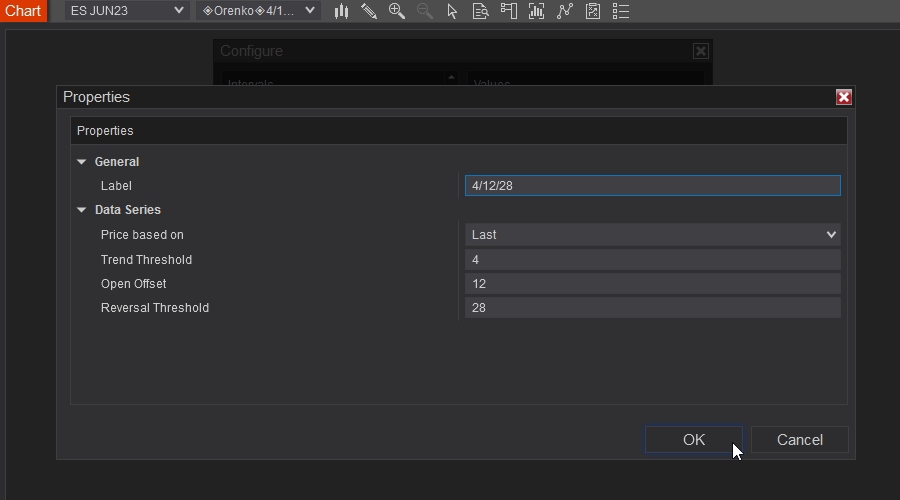
7. Values Explanation 4/12/28
Trend Threshold: 4
Every 4 ticks in the current direction a new bar is formed
Open Offset: 12
Forms the bottom of the bar 12 ticks from the open of the bar
Reversal Threshold: 28
28 ticks in the opposite direction from the open, a reversal bar is formed
8. To add the Orenko Threshold indicator select the indicator icon on the chart window.
9. Open the “Obsidian_Indicators” Folder in the available indicators tab.
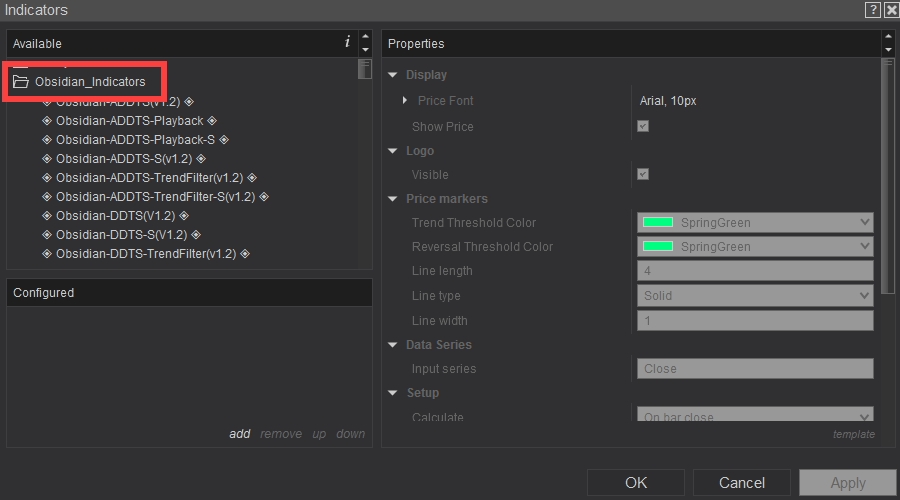
10. Double-click on the
“◈ Obsidian-Orenko-Threshold ◈” indicator in the available indicator tab to add it to the configured tab.
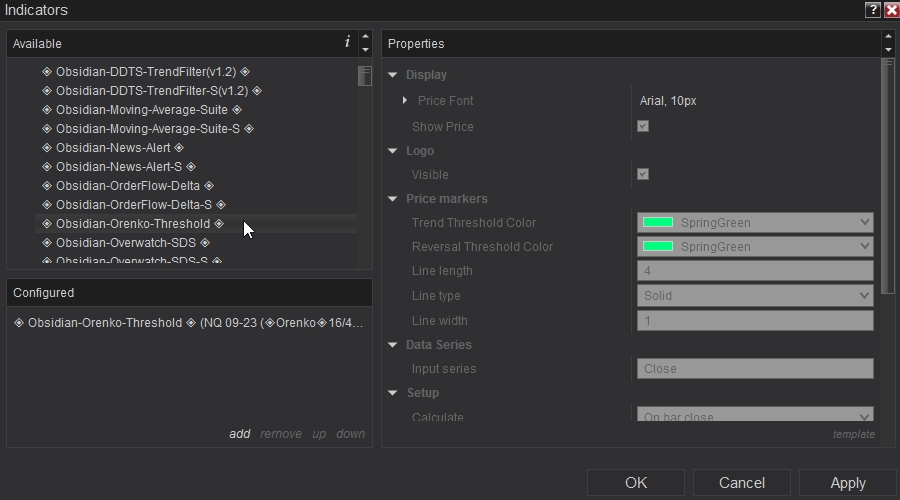
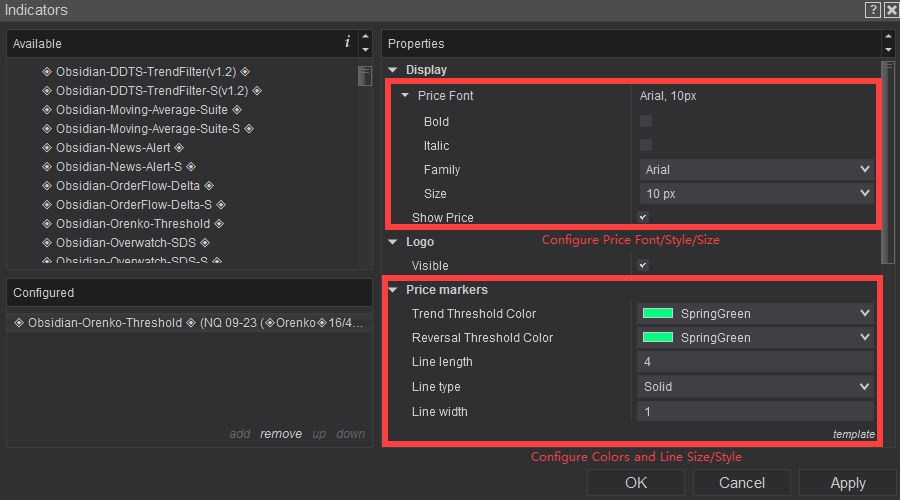
11. Click on
“◈ Obsidian-Orenko-Threshold ◈” in the configured indicators tab to change the default Font/Style/Size/Color
12. The Orenko Threshold displays the open price of the next 3 bars to be formed if the price is breached.
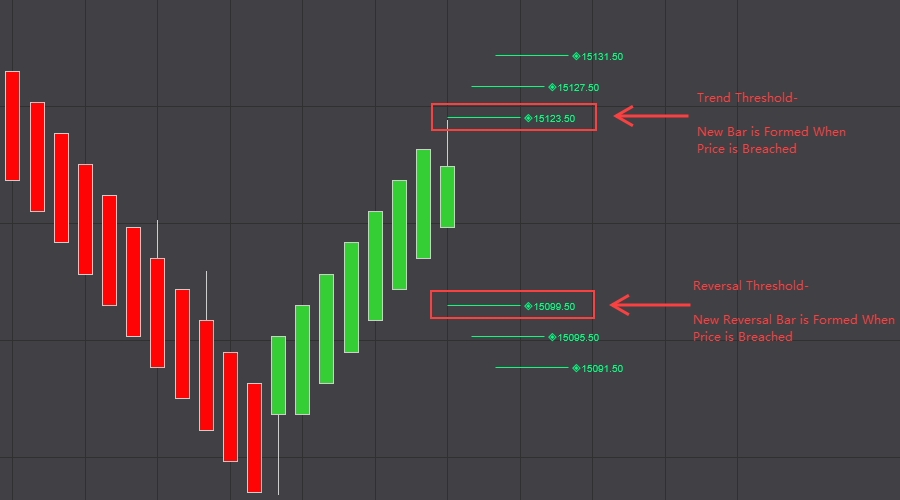
13. Example of the Orenko Threshold in action.
Jump to Quick Navigation
Frequently Asked Questions
Placeholder………………………………………………………………………………………………………………………………………………………………………………………..